Showing posts with label canning. Show all posts

Sunday, January 6, 2013

What a wonderful idea to put shelves in between studs in the basement! Perfect idea and very frugal!

Sunday, February 19, 2012

Spring Is In The Air!

Here in Kansas the weather has been phenomenal!

 The last several days have been in the 50's. It has given me Spring Fever beyond belief! So, I have been thinking about my garden and canning and came across alot of great information.
When getting ready to can again I decided next year I really need to have a plan.


First I needed to ask myself, what do I want to preserve this year? So, I started a list of questions.
What was popular last year?
What is still sitting on the shelf now?
What was best received as gifts last year?
What was a major pain the butt to put up?
Ta-Da a list of what we are going to can this year. Then there are the items that you know you will not repeat. Many jars of uneaten applesauce that were done because when the kids were smaller they absolutely loved applesauce.
Have your list of Must Have's, mine may include
Peaches
Salsa ( about 1000 quarts!)
green chilies
apple pie filling
tomatoes
Most important - Have a Plan 
We will garden with a purpose, of course for us to eat but we are not going to grow a years supply of turnips if we don't eat turnips!
Alot of people can and preserve all summer for their families needs for the next winter. Not many people actually can out of necessity. When it comes time to can or process food that we have grown make sure you reserve time for it. Mark it on the calendar, and don't let anything else get in the way. Invite friends or neighbors over and do it together. Maybe host a canning party!

Also before your canning project make sure you are well prepared, have all your items readily available and well stocked beforehand.

Sunday, January 8, 2012

Gardening in Kansas

I found a wonderful tool for gardening here in this great state of Kansas. It has a breakdown of when to plant and when to harvest certain items in your garden. Hope it helps!


Sunday, December 18, 2011

Great Example of Priorities - This family gave up christmas gifts to build their food storage

Adapted from Utah Preppers

For Christmas this year, we decided to forgo gifts and add to our dry-pack food supply. With access to a dry-pack canner through the local unit of my Church, I decided the most cost effective and efficient route this time would be to buy in bulk and do the canning myself at home. I purchased all of the food and supplies from The Church of Jesus Christ of Latter-day Saints Home Storage Center in Sandy.
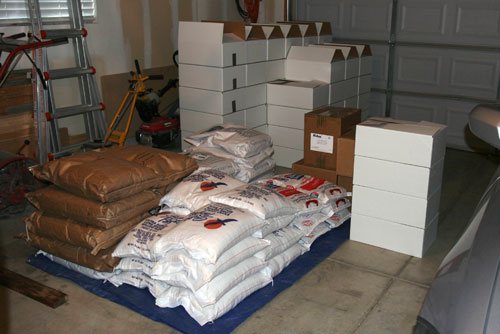
We were able to get everything we wanted except wheat which they were out of until the first of the year. I will be going back in a few weeks to finish off that part of the order. I did learn exactly how much will fit in a 4Runner, although I had more than the traditional blind-spot to worry about on the drive home. For this round, I canned rice, sugar, pinto beans, black beans, white beans, potato flakes, dry milk, dried onions, apple slices, and both quick and regular oats.
canner
The nice thing about the Home Storage Centers is that they have everything you need to complete the project including the cans, lids, oxygen absorbers, and boxes. They even had a temporary clip that you can use on the bag that holds the oxygen absorbers since they cannot be exposed to the air for longer then ten minutes or so or they will go bad.
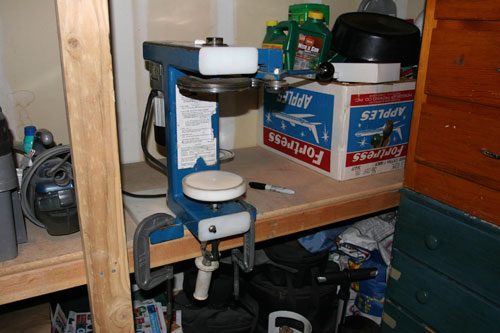
Dry-pack canning is really very simple—you fill the can up, drop in an oxygen absorber (except for sugar), put the lid on, seal it, and then label the can so you know what’s inside—but I learned a few things that helped me get more efficient after the first day. Instead of repeating each of those steps for each can, it is much easier to do thirty cans or so in a batch. Set up a long table next to where you have the canner mounted and then set up thirty or so empty cans. You can then open one of the bulk bags and pour across the cans filling them all in turn, without bending over or having to pick the bags up and setting them down again and again.
canner
You’ll then want to tap the cans on the table good and hard several times to get the food to settle, topping off as needed until the can contains is much as possible. I learned that with most items, if I fill the can until the contents are heaped above the rim and to the point of overflowing, they will usually settle down nearly perfect, leaving just enough room for the oxygen absorber and the lid. A few of the lighter items like flour and milk really compact though and you’ll need a cup of some sort to scoop extra and top off the cans. For the items such as apple slices, onions, and potatoes that come in a box, I found scooping the contents out with a plastic pitcher to be the most effect method.
I didn’t bother with labels for the cans and boxes, even though you can get them for free with your purchase from the Home Storage Center; I simply wrote on the cans with a black Sharpie. I then loaded the cans into cardboard boxes that I also purchased there six at a time and labeled the box as well. Obviously the more hands you have the faster the work goes but it is something that can easily be done solo. The only real possible obstacle I can see for some would be lifting and transporting the twenty-five pound bags. If you can get your hands on a canner, I would definitely recommend this approach.
So much does this cost? Was it worth the effort to can it myself? Using the price sheet, let’s break it down.
Equipment
436 cans @ $0.40/each = $136.08
436 lids @ $0.11/each = $35.64
436 oxygen absorber @ $0.07/each = $22.68
72 cardboard boxes @ $0.56/each = $33.04
Food
3 bags oats, regular @ $10.40/each = $31.20
3 bags oats, quick @ $10.40/each = $31.20
25 bags wheat @ $6.05/each = $151.25
15 bags rice @ $15.90/each = $238.50
12 bags sugar @ $10.50/each = $126.00
4 bags pinto beans @ $12.65/each = $50.60
5 bags pinto beans @ $14.35/each = $71.75
3 bags white beans @ $14.35/each = $43.05
3 bags potato flakes @ $28.05/each = $84.15
5 bags dry milk @ $44.45/each = $222.25
1 box dried onions @ $69.15/each = $69.15
1 box apple slices @ $64.95/each = $64.95
That’s $293.2 for supplies and $1184.05 for food and a combined total of $1477.25. We roughly purchased for 3.5 adults for one year. Let’s compare that with off the shelf options. Emergency Essentials has three packages: Ultimate, Premium, and Traditional costing $2,399.95, $1,549.95, and $799.95 respectively for a single adult year supply. While the each of these contains significantly more variety (dehydrated fruits and vegatables, drink mixes, pancake mix, etc), you can see that there is significant savings in doing the packaging yourself. Even if we go with Emergency Essentials basic package, it works out to be $11.11 per can whereas mine was $3.30 per can. How much did you spend on Christmas this year? Sure, I’d rather be eating the gourmet meal found in Emergency Essential’s Ultimate package, but this does show that there is no excuse for not having a year’s supply.

IS DRYPACK CANNING FOR YOU?

Ensign - August 1996
Random Sampler Section
Church members living near a Church-owned cannery are encouraged to participate not only in welfare canning sessions but also in family canning programs. The focus of the dry-pack canning program is to give greater assistance to families and provide more opportunities for them to obtain and store a year’s supply of basic, life sustaining products.

Members are invited to set up an appointment through their ward or stake canning specialist (your priesthood or Relief Society leader can tell you who this is) to use the equipment at their local cannery to dry-pack food. Canneries have more than a dozen products available to can at a nominal cost, or you can bring your own food and pay only for the cost of the cans.

Many stakes also have access to dry-pack canning equipment that can be checked out for individual use at home.

Dry-pack canning is an effective method for storing dry foods. Bulk storage foods such as wheat or beans are placed in large metal #10 cans, along with a packet that removes oxygen, then sealed without further processing. Food that is stored this way has an extended storage life and is protected from moisture, insects, and rodents.

The following basic food storage items are available at dry-pack canneries:

*Apples slices, dried

*Oats, rolled

*Beans: pinto, pink, great northern

*Onions, dry

*Puddings: Chocolate, vanilla

*Carrots, dry

*Cocoa, hot mix

*Rice, white

*Flour, white

*Soup mix

*Fruit drink mix

*Spaghetti

*Macaroni

*Sugar, granulated

*Milk, non-fat dry

*Wheat

Not all food storage items are appropriate for dry-pack canning. The following types of items do not store well in cans because of moisture or oil content. However, their shelf life can be extended by storing them in sealed containers in the freezer:

Barley, pearled

Granola

Cereal, milled-grain Nuts, roasted or raw

Cornmeal Rice, brown

Flour, whole wheat Yeast

Additional products that should not be home dry-pack canned include these products, which are best stored in their original containers and rotated frequently:

Baking powder

Baking soda

Bouillon

Mixes w/leavening, Oil such as pancake or biscuit mixes

Spices

Sugar, brown

For more information, contact your regional welfare agent, Church-owned canneries, local bishops’ storehouse, or stake and ward canning specialists.

Bring the Dry Pack Cannery Home

Dry Pack Canning w/ Photos

LDS Cannery: The LDS Cannery is a great place to dry pack commodities. The new facility in is a walk-in facility with no appointment necessary. Other facilities may require an appointment, so call first. Each facility has everything you need to dry pack: bulk products, cans, lids, oxygen packets, labels, and boxes. From my experience, it is best to work in groups of at least 2-4 so that the process moves more quickly. It is ideal to use the LDS cannery facility if you don't want the mess at home, you live close by, and your schedule is flexible. Be advised that you cannot buy commodities elsewhere and then bring them into the cannery.

Dry Pack at Home: Did you know that the LDS Cannery has dry pack canners that can be scheduled for home use? You can schedule the canner for about 3-4 days and have the flexibility of canning at home. Dry packing at home is ideal if you'd like have your kids help, if your schedule conflicts with the dry pack facility hours, if you'd like to do a little at a time over several days, or if you have product at home that the LDS cannery is currently out of. Here in Kansas we can check one out from our stake or from the dry pack cannery in KC.

Photos: Here are some pictures of our latest dry packing experience, done at home:

Step 1: If you want to dry pack at home, you need to prepare by buying commodities in bulk. Prices are great at the LDS cannery, but you might find cheaper product elsewhere. Gather the items ahead of time. Be advised that not every commodity is suitable for long-term storage due to high water content or oily components.


Step 2: Estimate how many cans you'll need, which is based on the pounds of product you have. Here are some estimates to guide you in your planning:

Wheat, rice, sugar: 4 cans per 25 pounds
Beans: 5 cans per 25 pounds
see a complete list here


Step 3:
Buy your #10-sized cans & other supplies from the LDS Cannery. Don't forget the metal lids, oxygen packets, labels, and boxes. You will need one oxygen packet for every can, except those cans that contain sugar (it turns the sugar rock hard). Six cans fit into a box (called a case). The LDS Cannery gives out free labels. Get one for every can and one for every box (that way each case is labeled on the outside).

TIP: Spend the time to calculate before you go to the cannery. That way you'll know exactly what you need and how much.


Step 4: The canner weighs about 40 pounds, so two people should lift it. I got it out of the tub on my own, but it was a battle. It is secured to the countertop with two C-clamps. Use a double-folded towel to prevent damage to the countertop.

Step 5: Fill the cans within 1/4 inch from the top. You don't want to leave the oxygen packs out too long because they are activated after about 30 minutes. So, get the cans all ready for sealing and put the oxygen pack in at the last minute (remember, no oxygen packs for sugar!)

Step 6: Seal and label each can. I let kids help fill the cans, but an adult should use the machine.


Step 7: Label the box with a product sticker, the number of cans in the box, and the year. If you have a case with, for example, 3 wheat cans and 3 sugar cans in it, use a sticker for each product. That way you'll know how many of each you have in the box.

Tip: if you decide ahead of time where and how your boxes will be stored, you can put the label in the correct spot. It helps!

Sunday, July 24, 2011

Canning grape juice


Grape Juice


1. Pick grapes.
2. Prepare quart bottles. I washed mine in the dishwasher on a sani-rinse.
3. Fill basin of steamer approximately 3/4 full of water.
4. Rinse grapes, picking out leaves or debris. Leave grapes on the stems.


5. Place grapes into steamer. Pack, but don't press.
6. Bring water in basin to a boil. Turn down to medium heat.
7. After about 50 minutes, you will be able to fill one or two still-hot quart bottles.
8. Place flats on full bottles and finger-tighten the rings.
9. Check water in basin. Refill if necessary.


10. After an additional 20 to 40 minutes, you should be able to fill approximately three or four more bottles. Place flats and rings.
11. Process in a water bath for 5 minutes (adjust for elevation). The USDA also adds sugar (which is optional) and an additional step of refrigerating, straining and reheating the grape juice before processing in order to reduce tartaric acid. The tartaric acid crystals don't bother me, so I skip this step. I add my own sugar when using the juice.
Here is a link to official recipes and water bath times: UGA - Grape Juice.

Also:
A. If you aren't going to strain the juice, don't stir or push the grapes or you will get a lot of debris in your bottles.
B. After filling my quarts, I did stir the grapes in the pot and then let it cook a little longer. I saved that juice to strain and serve that day. Approximately two total quarts were taken after the grapes were stirred.
C. I had an apple box and a full shopping bag full of concord grapes. It yielded about 20 total quarts.
D. We reconstitute our juice with a little more than a full additional bottle of water and 1/2 to 1 cup of sugar. Each crop of grapes is different. Adjust to your own taste.
My kids favorite is to reconstitute our juice with a 2 liter of seven up!