Showing posts with label house of order. Show all posts

Sunday, July 7, 2013

DIY Baby Gate

Ok, as many of you know we moved into a bigger place. I love it! However, we needed baby gates for my daycare. Have you bought a baby gate recently? They might as well finance them! They are expensive. So I got creative and made my own. I bought two shower curtain rods, good 'ol Walmart! Used a recycled flat sheet and voila... two baby gates that are definitely little kid proof, and because we rent, no holes in the walls!

Oh, and no ugly white clunky metal thing leaning on the walls after daycare hours, they roll up and tuck away in the closet! YIPPEE!!

Tuesday, October 2, 2012

Frugal, it doesn't mean being cheap it means being SMART!

There are so many sayings that we all have heard time and again. Some may be ,"Use it up, wear it out, make it do, or do without", which is one of my favorites; there are so many others. *Nothing is a waste of time if you use the experience wisely *"Not everything that can be counted counts, and not everything that counts can be counted." --Albert Einstein Well I have just tried so hard to do what I could to use it up, everything, not be wasteful. When there are leftovers (save them and freeze them) how many times recently that I was going to throw away a little corn or green beans that were left and at the time not worth saving, keeping them in a small container in the freezer, after a couple weeks there's enough different veggies in there for a "FREE" meal of wonderful beef veggie soup! Wear it out - I am losing alot of weight (Thank Goodness!) so instead of having the fun LOL and the cost of buying more clothes I just keep taking them in! I am grateful for anything friends or neighbors give me for my kids or anything else for that matter and I use it the best that I can! I bought a bunch of fleece pajama pants that ended up being way to big for Brian and instead of taking them back because they were only $2.00 per set of pajamas, I used the material for the pants and used that to make the boys new fleece hats and matching mittens. Then the shirts I took in and remade them so I could wear them. I also when going through the boys clothes try to find other uses than clothes for them. I think I already blogged about this too but I picked up two king size sheets at a thrift store close to us for .99 cents and ended up cutting them into squares and made 44 (approx.) cloth napkins! Can't buy material for that price! Please share with me what ways you are trying to be more frugal and smart! I would love to hear and learn from your ideas as well!

Thursday, April 19, 2012

Freezer Recipes

Taco Soup
2 pounds cooked hamburger
2 cans hominy, not drained
2 cans corn, not drained
2 cans green chilis (4 oz)
2 cans chili beans
2 cans black beans
2 pkg. taco seasoning mix
2 pkg. hidden valley ranch seasoning mix
mix all divide into two gallon size freezer bags, freeze flat on a cookie sheet. To cook, thaw 24 hours ahead then warm through or can put in crockpot on low until warm.
Serve over tortilla chips top with cheese or sour cream


Mexican Beef and Rice
2 pounds hamburger, cooked
1 large can olives, drained and sliced
2 cans black beans, drained and rinsed
4 cups cooked rice
2 pkg. taco seasoning mix
2 small cans tomato sauce
mix all into two gallon size freezer bags, "squish" together, forgot to make sure you know it is important to get as much of the air out of the bags to avoid freezer burn! Freeze flat on a cookie sheet. To serve warm through, can be put in crockpot on low. Serve with tortilla chips and top with sour cream, can also use as a filling in a flour tortilla along with avocado and lettuce.

Sloppy Joes
3 pounds cooked hamburger
2 cups onion, chopped
3 tomatoes chopped or can use 2 cans chopped tomatoes
3 cloves garlic, minced
1 tsp salt and pepper
Sauce
1 (30 oz) can tomato sauce
15 oz can v8
7 tsp worcestershire sauce
7 Tbsp brown sugar
7 Tbsp lemon juice
1/2 tsp ground red pepper, optional
1/2 tsp chili powder, optional
Mix well, divide into three small freezer bags, "squish" together. Lay flat to freeze, can place in crockpot on low to serve. Serve on buns with pickle spears.

Taco Meat
- self explanatory
one note, I do use my own already made taco seasoning instead of buying it from the store.
 When time to use, you can just microwave for about 4 -5 minutes and your ready for tacos!!

Tater Tot Casserole
2 pounds ground beef, cooked and drained
mix in 2 cans cream mushroom soup or make your own
layer your choice of vegetables, sometimes we will use peas, canned or frozen, this time we used frozen mix veggies.
top with tater tots and shredded cheese.
Layer each in a 8 x 8 pan (I use the glad ware that can be used in micro, dishwasher, and oven and freezer).
To cook thaw 24 hours in fridge then cook 350 for about 25 min or until bubbly.

Beef Stroganoff
3-4 pounds ground beef, cooked and drained
3 onions sliced thin, cooked with ground beef
2 packages onion soup mix or make your own
4 cans sliced mushrooms, or fresh or frozen will work
2 lg boxes of beef stock or beef bouillon and water
bring to simmer, add 4 Tbsp of flour to 1/2 cold water and mix into the pan, will thicken quickly. Lower heat, don't add sour cream until right before serving.
Freeze in 3-4 freezer bags, lay flat to freeze.
To serve can put in crockpot or warm on stovetop, add 1 cup sour cream right before serving, serve over hot egg noodles or rice.

Baja Citrus Swai
Ok, I really cheat here but I can't find a good hm recipe for the seasoning that compares to this.
I buy the McCormick Grill Mates Baja Citrus Marinade and add the vinegar, water and oil to this
We also buy the Swai Filets from WalMart, they come frozen individually packaged. I open then and cut them in half because they are quite large fillets. So three filets are plenty for our family. I layer then in a gallon freezer bag and dump the seasoning and other ingredients, swish it around a bit.
To serve thaw 24 hours in fridge, then grill or bake.

Ok, this isn't all of them but it's a start!!

Wednesday, April 4, 2012

RS Freezer Frenzy

Well tonight our lovely RS prepared freezer meals as our monthly activity. It was so much fun! One of the ladies in our organization tallied up a list and purchased all the ingredients. Those that signed up brought their own meat (enough for their families) for two meals. We were also asked to bring two extra chicken breasts so that while we were doing these meals for ourselves we made them for other families that might need a meal to be brought in. Sometimes when there is an illness, baby born, death, etc. we take meals over to help out that family. I will have to find out how many "extra meals" we were able to do. They were great!
We made Teriyaki Chicken, and Cranberry Chicken. Thanks for all your hard work Holly!
Cranberry Chicken
In a gallon freezer bag mix the following
1 can cranberry sauce
1 cup french dressing
1 pkg. onion soup mix
6 boneless skinless chicken breasts (my mom did pork loin chops)
mix in bag and freeze flat, to serve thaw 24 hours prior to cooking in fridge. Place in 9x13 pan and cook for 45 min at 350. Serve with rice (our favorite is Jasmine).
Teriyaki Chicken 
In a gallon freezer bag, mix the following
6 boneless skinless chicken breasts
1 can chunk pineapple, undrained
1 small package of baby carrots
1 onion, chunked
1 (10 oz) bottle teriyaki sauce
1 tsp garlic minced
1 1/2 cup water
To serve, thaw 24 hours prior to cooking in fridge. Place in crockpot and cook on low for 6-8 hours. High for 4 hours. Serve with rice (again, ours is Jasmine).

Sunday, January 22, 2012

Using My Food Storage

I love these containers for storing regularly used items from our food storage, then we refill them as needed. 
These are from my kitchen cabinet, nothing fancy but thought I would share how we use our long term food storage items regularly!

Long Term Food Storage Basics - How to Pack Rice, Wheat, Beans and Dry G...

Tuesday, January 10, 2012

My Freezer Cookin Weekend!


Freezer Cooking Session!!


Ok, well I attempted a long weekend of freezer cooking. I am not quite done yet but have realized I need to make sure I am doing this religiously. For our menu for 30 dinners, 15 breakfasts, and baked goods I only spent $88!! Granted, yes I have a pretty good food storage but I got a steal on meat. Turkeys of course on sale we already had one and when I went to walmart the thawed turkeys were only $.50 per pound. That is a steal so I cooked 45 pounds of turkey this weekend ( thanks moms roaster!). I also made 6 packages of homemade hamburger buns and hotdog buns, muffins, and banana bread. I will post more when I finish up.

Sunday, December 4, 2011

Awesome Water Storage Racks

The images show the resulting racks after 2 days of construction. The most time consuming aspect was cutting the wood to the proper sizes.

(Some of you may arrived at this page from another source. The plans are posted online, with a brief description HERE. )
Fully assembled racks with loaded #10 cans and barrels full of water.

Assembled racks, without cans and with unfilled barrels. This was done to test the layout and make any final adjustments before the water was added.

Close up of the can shelves and how the lands were created.

Hose bib detail.

This shot shows the shelves and the various methods to ensure cans are kept linear and do not roll off/out of the shelf

Food Prices To Double By 2030!

If this site and many others online haven’t inspired you to put some effort into building a well-rounded food storage supply and learning to use it, I think this article on the global food demand will add some encouragement.
http://www.foodnavigator.com/Financial-Industry/Food-prices-could-double-by-2030-says-Oxfam
I found it scary initially, but then thought, “Isn’t this why we’re trying to be diligent about preparedness?”  I still feel faith instead of fear will keep us fed.  Be consistent and organized with planning your food storage, and continue to improve your supply week by week.

Saturday, December 3, 2011

How To Fake A Clean House - Works!! I Promise!

An old friend calls and says she's in the neighborhood and wants to drop by in 15 minutes. You look around and wonder how to get this mess clean in a matter of minutes. The following eight steps will help you fake a clean house. Start at the beginning and do as much as you have time for until your guests arrive.
Difficulty: Easy
Time Required: 5-20 minutes

Here's How:

  1. Odor Control Spray your favorite air freshener to remove any unpleasant odors. Pay special attention to the trash areas. Turn up the air conditioner, a fan, or open the windows to get stale air moving. Throw something sweet and tasty in the oven. Some women I know keep frozen cookie dough on hand for this very occasion. Not only will the house smell wonderful, but you'll have a tasty treat to serve your guests.
  2. Clutter Control Nothing makes a house look messier than clutter. Grab a laundry basket or a sack and begin gathering up items. Don't worry about putting them away. Just stow the basket or the sack out of sight until after the guests leave.
  3. Freshen Yourself In your clean bathroom mirror, examine yourself. The truth is that your guests will spend more time looking at you than at your house. If necessary, change clothes, run a brush through your hair, put on some deodorant and/or spray body splash.
  4. Living Room The place where you'll be sitting and visiting the most, needs the most attention. Since you've already removed the clutter, and made it smell nice, now all you have to focus on is tidying surfaces. Work quickly from left to right tidying each surface and removing any extra clutter. Quickly vacuum the main walkway of the floor.
  5. Bathroom Grab disinfecting wipes or a cleaning cloth and all-purpose spray. Wipe down all the surfaces quickly. Remove any clutter. Change the trash. Quickly wipe down the mirror. Make sure there is hand soap, a hand towel, and toilet paper accessible.
  6. Entryway The first thing that your guests will see is your entryway. Remove any clutter. Tidy up with a broom or handheld vacuum.
  7. Dishes If you have a few spare minutes, load those dirty dishes in the dishwasher, or rinse and stack them neatly in the sink. Take a cleaning wipe and wipe down the kitchen surfaces.
  8. Other Areas If you've finished all this and your guests still haven't arrived, keep doing small chores until they arrive, focusing only on rooms they will see. Some ideas might include, vacuuming floors, changing the kitchen trash, dusting ceiling fans, and straightening books and magazines.

Tips:

  1. If guests are going to spend more time in another area of your home, substitute it for the living area, and focus your time there.
  2. Disposable cleaning wipes make a good quick helper, but you can also use an all-purpose spray and a cleaning cloth.
  3. Once you've finsished your quick cleaning, and your guests arrive, don't apologize for the state of your home. Guests come to see the host/hostess, not the house. Unexpected company, especially, will understand if everything isn't perfect.
  4. Enlist the help of children and/or spouse to make the quick cleanup go even faster. One silly thing my family does is to have "practice" sessions when we aren't expecting anyone, to see if we can beat our best times.

What You Need:

  • Air freshener
  • Large basket or sack
  • Brush, body splash/deodorant, clean clothes
  • Handheld vacuum or broom
  • Cleaning wipes or all-purpose spray and cleaning cloths
  • Dishwasher or dishwashing supplies

How to Build a Root Cellar

Here’s what some of you might have been waiting for, the picture sequence of the root cellar (many images follow):

Starting here (my first picture) of this project:

To this:

to this:

to this:

to this:

to this:

to this:

to this:

to this:

to this:

to the final covering with a huge double-layered tarp:

to this:

Final picture of the front still coming, I literally forgot to take this shot!
It’s just a big pile of dirt now from the outside, but inside, it’s cold (49 degrees), roomy, dry and useful. Overall finished dimensions are 13 x 24, cost is about $1200 I think or a bit more. The green tarp was pretty expensive, but certainly worth it.
Things I learned:
a) dig a BIG hole, you will be needing it for room to work.
b) remove ALL organic debris as you go. Easier to remove it before you bury it in your waste pile and then dig it up again.
c) budget for more cost then you expect (at least double).
d) budget for more time then you expect (triple in my case).
e) getting holes and posts and logs square is hard to do, dimensional lumber is much easier, but work at it. When you then apply dimensional lumber over non-dimensional logs, it’s hard to get things to line up. Remember things like 4 feet, 8 feet and such like if you are going to use dimensional anything.
f) remove all the rocks you find as you go. Don’t put any around your posts either, you’ll invariably have to remove them when you try to fix a mistake, not fun.
g) trim your logs and remove all the stubs. You can do this after they are installed if you handy and safe on a ladder with a chainsaw (I did) or clean them up before installing, either method works, I didn’t find one method easier then the other.
h) grade ALL your lumber in advance, make sure you have enough and it’s up to the job you intend it to do. I ran out of roof trusses, and opted for tamarack instead of cedar, only 1/4 of the cellar trusses are cedar, although tamarack (larch) is far stronger and will still last a long time.
i) keep your work area clear — of everything. I can’t begin to tell you how many times I’ve moved stuff around. Mostly, realize that you will need access to the entire outside area of the cellar, which I did not have. I hand dug and hand shoveled a great deal as a result, power equipment cannot move at all around stumps, boulders, trees and bushes (unless you like breaking things). This is probably one of the really big issues I’d emphasize, remember, you are going to need plenty of room to maneuver.
k) be prepared for some seriously hard work, there is a lot of sweat that goes into one of these things.
l) listen to your wife or spouse or whoever, they might have some good ideas, otherwise, tell ‘em to shut up and get back to work!
m) you really can do anything you want, there is no perfect way to do this.  The pioneers had far less to work with then we do today and did everything the “hard way” (without petroleum or any of its downstream benefits like ice in your water bottle or a hot shower waiting for you at the end of the day).

Saturday, November 19, 2011

Snapping Reusable Paper Towels!

Love this idea, will post the instructions here in a little bit. Can't wait to make these!

 Here is a great idea for reusable, snapping "paper" towels on a roll. These paper towels are turned and topstitched, with a layer of flannel and a layer of birdseye. They have snaps to allow them to snap together. It also made a center core (it's washable too!) that coordinates with the towels.


                                Can't wait to make these, they look simple and way big on saving $!


Are you tired of spending money on paper towels?  If so, try “unpaper” towels!  Unpaper towels are reusable cloth towels – just wash and reuse instead of throwing them away!  This tutorial will show you how to make a set of unpaper towels – you can even add snaps and wrap them around a regular paper towel roll for extra convenience!
First, you need materials!  You need an absorbent material (I use terry) and a “decorative” material (I use flannel).  For the absorbent side you could also use cotton birdseye, old (thin) bath towels, or microfiber.  For the “decorative” side you could also use any woven (non stretchy) cotton material.
Cut your materials into 12 inch squares.  Make sure you cut your pieces as close to perfectly square as possible!!  This is important, because if you cut a little crooked here, then sew a little crooked later, you will end up with very lopsided towels! (Not that I know from personal experience or anything….)

You should be able to get about 9 pieces out of each yard of fabric.  (So 9 pieces of flannel and 9 of terry.)

Place one square of flannel and one square of terry on top of each other (right sides together.)

Pin all the way around (I use the bare minimum number of pins because I hate pinning, but if you are new to sewing, make sure to use plenty so your pieces don’t shift while you are sewing.)

Now choose a side and start sewing!  One hint: start in the middle of a side (not in the corner) – this will make it easier to close up the hole after you turn your towels right side out.  I like to do about 1/4″ seam allowance by running the edge of the sewing foot right along the edge of the fabric.

Sew straight down to the corner, stop with your needle down about 1/4″ from the corner.

Keeping the needle down, lift the sewing foot and turn the fabric (pivoting on the needle)

Sew down that side, and keep going around each side until you get (almost) back to where you started.  Leave about 2 inches open (the smaller the hole, the easier to close it up, but make sure you leave enough room to turn it.)

Turn the towel right side out through the opening.  Make sure to push the corners out completely so they are square (use your finger or a pencil.)  You should now have a perfectly square two-sided towel!

Pin the opening shut (with the edges folded under)

Now carefully sew it closed with your machine.  Keep your needle close to the edge, and go ahead and stitch all the way around the towel to give it a nice finished edge.

Congratulations! You have a nice unpaper towel!  Now make as many as you’d like for your set (I usually do sets of 6-12.) These make excellent wedding and housewarming gifts (I include a card with some information about unpaper towels – what they are, how to wash them.) I’ll be doing a separate tutorial later on making cloth wipes, but I’ll tell you a secret – you make them the EXACT same way!  Just cut your pieces 8 inches square instead of 12!
If you’d like to add snaps, keep reading!  If you don’t have a snap press or snap pliers (or prefer not to have snaps) you can just fold your towels and store them on the counter or in a kitchen drawer.

You can get a set of snap pliers and plastic snaps from Kamsnaps.com You need to put one snap in each corner – two sockets and two studs

Now, here is the tricky part – you need to put the two sockets (the parts with the “dip”) facing toward the flannel side, and the two studs (the parts that poke out) facing toward the terry side.
See? Socket…

Stud!

If you are unsure if you are doing it correctly, snap the towels together as you go to make sure!  When you are finished, snap all of them together…

And roll them up on an empty paper towel roll.

That’s all there is to it!

Make Your Own Can Organizer for Food Storage Organization

From: Thenshemade.blogspot.com

Ok, I've been known to re-purpose things before like when I made a tote bag out of business cards for a friend.  Or when I made a much needed container for my bathroom out of Tampax box - (don't worry it was covered and changed enough that no one knew what it was. Hubby would have died if it was recognizable).  I've made candy dishes from gladware packaging. (I'll show that one soon - stay tuned!) You get the idea.  Anyway, it's just the way my mind works, I see something for what it is but then my mind switches gears and starts designing what it could be. 

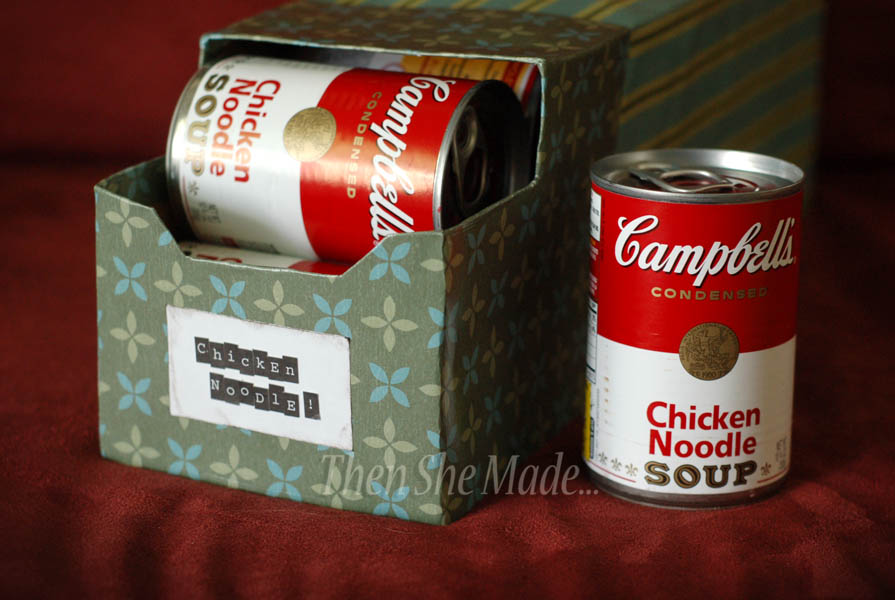
That's what happened with my project for today.  It actually came out of need.  I don't like stacking my cans.  They never stay orderly.  They always fall over.  Or they get pushed to the back of the cupboard and I forget what I have and it BUGS me.  So, I made this.


Yes, I know you can by self-rotating Can Stackers for food storage but the small ones are $32 and frankly, I'd rather make my own and so that's what I did.  I had everything on hand except for the soda so the out-of-pocket expense was $3.50.  Here's how I did it....


 1- First, I needed an empty fridge pack of soda.  My kids were thrilled to find rootbeer in the fridge.  I  bought it specifically for the packaging - is that wrong?  Not really, just backwards, I guess.


2- On the back end of the container I cut out a space that is large enough to put a can of soup in.


3- I grabbed some decorative paper (I used about 3 sheets of 12x12 scrapbook paper)  and folded it into place to cover the box.  I put everything in place, creased my edges and cut out my opening to fit the one I had cut in step 2.  Then I just took some Mod Podge and glued all the paper into place.  I did the back end of the box first and let it completely dry.

4- Once the back end was done drying, I grabbed another piece of paper and repeated the steps until the front part is covered.  And, just to make it more decorative, I used a coordinating paper for the front.

5- Then I added a label to the front and added a coat of Mod Podge over the whole thing - this gives it a little more strength and will keep the papers from tearing.


So, that's it.  To use it, I just always add my soups to the back and take from the front, that way they are properly rotated.  And, the best thing, I don't have to stack my soups anymore.  Plus, each soup flavor is kept together which means no more hunting through my pantry for the flavor needed.  I can have a box for chicken noodle, cream of chicken, corn, peas, whatever... And, I can make as many as I need and my cupboard is organized.